Mince Pie Monday

1 December 2014


Mince pies are my festive weakness. I have a strict rule that mince pies must only be eaten in the month of December. Today, being the 1st of December, sees that invisible (tinseled) bar lifted.
Joy of joys - Mince Pie Monday is here!

I made these mince pies over the weekend to store in the freeze ahead of the festive season. Naturally half a dozen have been put aside for quality control testing. It's the right and responsible thing to do if you intend serving any to guests over the festive proceedings.

Mince Pies


Makes approx 16

200g mincemeat (buy the best you can)
50g dark chocolate chips
250g cold butter, diced
400g plain flour
½ tsp mixed spice
150g golden caster sugar
1 egg, beaten to glaze
icing sugar

Preheat the oven to 200℃ / 180℃ fan / gas 6

Mix the mincemeat and chocolate chips together in a bowl and set to one side.

To make the pastry, tip the butter into a bowl with the flour and spice. Rub together until the mixture resembles fine breadcrumbs. Add the sugar and squidge together to make a pastry dough. Don't be tempted to add any liquid - it will come together eventually, I promise.

Once you've formed your pastry into a ball, place it onto a floured surface and halve it. Take one of the halves and roll it out and using a circular cutter, cut out as many rounds as the dough will give you and line a shallow tart tin. Spoon your mincemeat filling into the pies.

Take your second ball of pastry, roll it out and cut rounds as before. Using a pastry brush or your finger, lightly wet the underside edge of the circles and place them on top of your pies. When all your pies have their tops on, brush with some beaten egg.

Place in the oven and cook for approx 20 mins or until golden. Remove the tins from the oven and cool a little before carefully easing the pies out of their individual compartments and leaving them to cool further on a cooling rack. To serve, lightly dusted with some sifted icing sugar.

{Silo Interview} Over On We Heart ...

14 November 2014

Last month, Silo, the UK's first zero waste restaurant opened in Brighton. Housed in an old warehouse in the North Lanes, Silo is a restaurant, bakery and coffee house that adopts a pre-industrial food system that generates zero waste. 

We Heart, a blog that explores the intersections between arts and culture, lifestyle, living and travel, asked me if I fancied popping along to Silo for a chat and coffee with their pioneering chef Douglas McMaster. Naturally, I jumped at the chance. Quite frankly we could have nattered to the cows came home. His food is second to none and his passion infectious and inspirational. Click here to read my post over on We Heart.

Photography: Image 1 & 2 - Lisa Devlin | Image 3 XDB Photography 

A Red Cabbage and Tarragon Slaw with Artichokes + Croutons

20 October 2014


I can remember being in junior school and making coleslaw in a home economics lesson. I can't recall anything else we ever made. I used to love creamy coleslaw as a child; I remember buying tubs of it by weight at the supermarket deli counter and vinaigrette coleslaw too. They were the two options back in then. Whatever happened to the tangy vinaigrette variety? I've not seen it in years. 


I still love a good slaw, though when making it myself I like to go a step or two further than the traditional, white cabbage, onion and carrot combo. This version came about purely by an impulse purchase of a red cabbage and what I had in the fridge that needed to be put to good use. 

I like using red cabbage in the colder months for a slaw and adding some herbs for freshness and  interest: in this instance I used some tarragon for its warm aniseed flavour. The quantities given below will produce a bounty of slaw to keep you going through the week, with enough spare to give a few tubs away to your nearest and dearest. If you want a smaller amount just half or adjust the recipe to suit.


Red Cabbage and Tarragon Slaw with Artichokes + Croutons

½ red cabbage
1 red onion
200g brussel sprouts
4 medium carrots
30g fresh tarragon
50g pumpkin seeds
100g creme fraiche
5 tbsps good quality mayonnaise
2 tsp nigella seeds
juice of ½ a lemon
1½ tbsp cyder vinegar
285g jar of artichoke hearts in oil
1 ciabatta loaf
olive oil
dried basil

Preheat the oven to 200℃ / 180℃ fan ready for baking the croutons.

Thinly slice the cabbage, onion and sprouts and grate the carrots on the coarse side of a grater. Add the shredded vegetables to a large mixing bowl. Finely chop the tarragon adding all but a small handful to the bowl. Next add the pumpkin seeds and give it a quick mix.

Now add the creme fraiche, mayonnaise, nigella seeds, lemon juice and vinegar. Give it all a good stir and taste for seasoning adding salt and black pepper to your taste. Set to one side. 

To make the croutons slice the ciabatta loaf into cubes that are approx 1" square. Place these in a single layer on a baking tray and drizzle with olive oil. Sprinkle over your reserved tarragon and a shake or two of dried basil. Toss the cubes of bread to ensure all sides are coated in the oil and herb mixture. Place in the oven and bake for approx 10 mins, shaking them gently half way through the cooking to ensure they are golden on all sides.  Remove from the oven and set to one side.

While the croutons are baking fry the artichokes in a small frying pan using a little of the oil from the jar. Once they are golden and slightly crispy remove them onto some kitchen paper.

Serve the slaw topped with the artichokes and croutons. Enjoy.


The Start of Something Savoury: Yellow Beetroot + Feta Tart

8 October 2014


I am going to start featuring savoury recipes on the blog. If you read this blog, you could be forgiven for thinking that I only bake cakes and that I bake them often. I probably do bake cakes more often than the average person, but they are, in most instances, for other people or to share with other people at a gatherings.


The food I most often cook is savoury everyday family food. We're a family of pescetarians who like to eat with the seasons. Today I am sharing this recipe for Yellow Beetroot and Feta Tart. This recipe came about as I had three yellow beetroot on borrowed time and a pack of feta cheese in the fridge. We've been eating it cold with salad for lunch this week, but it can also be served warm for supper maybe with a baked potato and some wilted chard on the side.


Yellow Beetroot + Feta Tart

1 pack of ready rolled shortcrust pastry
3 Beetroot (yellow or regular), peeled and coarsely grated
1 tbsp olive oil
1 red onion, finely sliced
1 tbsp balsamic vinegar
fresh thyme
1 tbsp soft brown sugar
140g feta cheese
2 eggs, beaten
150ml creme fraiche
nigella seeds (optional)
dried purple basil (optional)

Preheat the oven to 180℃ (160℃ Fan). Line a regular flan dish with the pastry, leaving any excess pastry hanging over the rim. Line with baking parchment and fill be baking beans (or other baking weights) and bake blind for 10 mins. Remove the paper and pop it back into the oven for a further 5 mins, or until the pastry is pale and slightly golden. Trim the over hanging pastry and place to one side to cool while you get on with preparing the filling.

Heat the oil in a frying pan and cook the onion over a low-medium heat until soft. Add the beetroot, vinegar, sugar and a splash of water to loosen. Next throw in some thyme leaves picked from several sprigs. Cook, stirring occasionally for 5 - 8 mins, until everything is soft and there is no liquid in the pan.

Cool the filling slightly, then spread over the base of the tart. Next crumble over the feta cheese. Whisk the eggs together with the creme fraiche and season with a little black pepper. Pour this over the feta and spread to cover the surface.

Cook in the oven for approx 30mins, or until set and golden. Leave to cool slightly before scattering with extra thyme sprigs, nigella seeds and dried purple basil.

My Pop Up Tearoom for Macmillan Cancer Care {Year Three}

29 September 2014


On Friday morning I held my annual 'cake spread' for Macmillan Cancer Care. It was my third year and looks set to be the biggest one yet, with £360 raised so far (a few more donations are still to come). As with every year, I had no time to photograph everything properly. These snaps were taken without much care five minutes before my first customer arrived, but it serves as a record of sorts.

This year the offerings were as follows: Lemon Meringue Roulade with Fruits of the Forest Coulis; Blueberry Cake with Cream Cheese Frosting; Lavender & Apricot Biscuits; Orange & Almond Cake; Chocolate Stout Cake with Whisky Frosting and Figs; Blackberry, Almond & Cardamom Cake and Chocolate Brownies.

a BIG thank you to all of you who came. X


An Autumnal recipe for Tesco Home: Crumble {and Custard}

23 September 2014


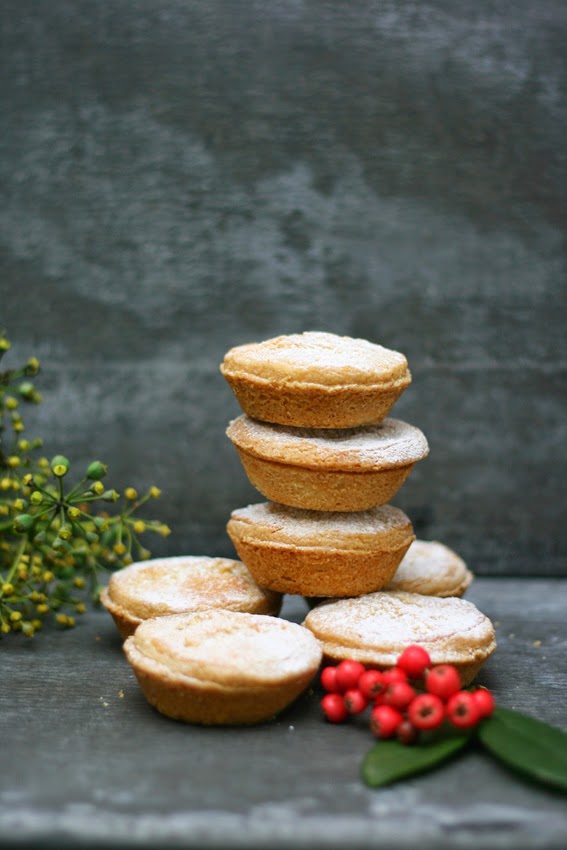
I love a change of season with its shift in seasonal produce dictating change in the kitchen. Mother nature has pretty much timed it to perfection. Just as the appeal of fresh crisp salads and strawberries & cream start to fade away along with warm summer evenings, along come the soups, casseroles, apples and blackberries to take us into the cosy season. It's the back-to-school and throw-a-sweater-on season, and one of my favourite times of the year.

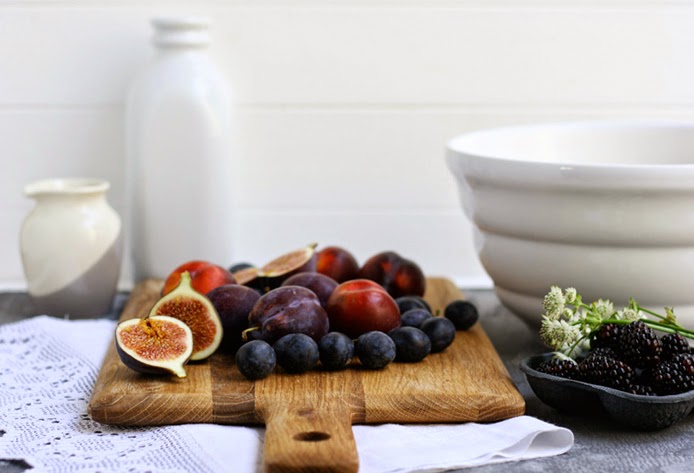
Today, I am sharing my first autumn recipe of the year: Plum, Fig and Blackberry Crumble served with a White Chocolate and Cardamom Custard. It's a recipe that Tesco Home asked me to develop for their new autumn / winter 2014 kitchenware collection which launched this month. My favourite pieces, all of which I used in creating this recipe, include the nostalgically shaped porcelain milk bottles, the contemporary grey dipped crockery, baking dishes in a range of muted colours and a generous oak chopping board which is already earning its keep in my kitchen by doubling up as platter for serving food. These purse-friendly considered designs are as useful as they are good-looking - perfect for the home cook with an eye-for-design.

Credits: grey dipped sauce jug, £4; white porcelain bottle, £5; large ribbed mixing bowl, £8; large oak chopping board, £18; grey medium baker dish, £9; grey dipped cereal bowl, £4. All available now from Tesco Home.

For the recipe, please scroll down.

Crumble recipe, styling & photography: Buttercup Days
Custard recipe: Cooking Fror Real Life by Joanna Weinberg
#tescohome
@tescoliving


Plum, Fig & Blackberry Crumble with White Chocolate & Cardamom Custard.

The quantities given below for the crumble topping will make far more than you will need. Just place the leftover crumble topping in a freezer bag and pop into the freezer. You can add direct from the freezer to any fruit base you have to hand for an almost instant crumble. I have given rough quantities for the fruit base. It isn't an exact science, but you want enough to half fill your dish. I prefer not to add sugar to my fruit base as I think the sugar in the crumble topping and the sweet custard add enough sweetness. However should you wish to stir in a tbsp or two of caster sugar to your fruit, I will not judge you.

Ingredients for the crumble topping:
250g butter, diced
310g plain flour
350g soft brown sugar
85g oats
pinch of salt
2 tsp mixed spice
125g of nuts, roughly chopped if large (I used a mix of pistachio, pecan and almond)

Ingredients for the fruit base:
6 plums
2 figs
a punnet of blackberries
1 - 2 tbsps of apple or orange juice

Ingredients for the custard:
150ml whole milk
150ml whipping or double cream
50g white chocolate, grated
5 cardamom pods, shells removed, seeds pounded
2 medium egg yolks (free range please)
50g caster sugar

Preheat the oven to 200℃ / Gas 6.

To make the crumble, lightly rub together the butter and flour until the mixture resembles coarse, slightly chunky breadcrumbs. Stir in the sugar, oats, salt, spice and nuts. Put to one side, while you prepare the fruit.

Stone your plums and cut into quarters or sixths if they are large. Cut the figs into similar sized segments. Add to your baking dish along with the blackberries. You want your fruit to fill roughly half the capacity of the dish. Add a plum or fig more if you need to increase your volume of fruit. Drizzle 1 - 2 tbsps of juice over your fruit. 

Top your fruit with the crumble, bagging up the left over crumble for the freezer. Bake the crumble for about 20mins, until the top is golden and the fruit is bubbling at the edges.

To make the custard, place the milk, cream, grated chocolate and cardamom in a pan and heat gently, stirring occasionally, so that the chocolate doesn't stick or burn, until the milk steams and tiny bubbles prickle at the side of the pan. Remove from the heat and cool a little.

Mix the egg yolks with the sugar in a bowl, and slowly stir in the milk and chocolate mixture. Rinse out and dry the milk pan and return the mixture to it. Cook over a medium-low heat, stirring, until the mixture thickens enough to coat the back of a spoon, being careful not to let it curdle. Serve immediately with the crumble. Enjoy.


Helsinki: Big Ships, Small Islands, Moomins + The Best Coffee

5 September 2014

In my last post I shared images of our 'base camp' in Finland. It was, as the photographs show, in the middle of nowhere and a rental car was pretty much essential. Despite it's romote idyllic location we were only a 30 minute drive away from the images you see here: Helsinki. It really was the best of both worlds. Helsinki didn't disappoint as far as capital cities go. It is spotlessly clean and well maintained. There is some striking architecture, family-friendly museums, great places in which to eat and drink and the harbour with its gateway to all Helsinki's beautiful little islands. It's a very special place.


We took a boat trip to a near island, the price of which was included in our travel pass.


And we were mesmerised by the giant ships that came and went.


When visiting any city overseas we like to try out the public transport. Helsinki station was a stunning building both inside and out.


Helsinki isn't vast, and we managed to cover most of it during our time there. The Design Museum was a highlight. The proud Finns consider good design a part of everyday life. The local supermarkets all stock Iittala, Arabia & Marimekko kitchenware - in fact they don't really stock many other brands. But then why would they?


We took a trip out to the 1952 Olympic stadium and visited the fantastic Tove Jannson centenary exhibition which celebrated the fascinating life and work of the novelist, painter, illustrator and, as she is best known, author of the Moomin books for children. Did you know that the Moomin stories go back as far as 1945? Moomin's are very much loved in Finland and there are two Moomin shops which Lily and Arthur both took a shine to.


Helsinki is great for food and drink. Then there was the coffee. It was seriously good. Helsinki has lots of independent coffee shops, including Johan & Nyström by the scenic harbour. Not only did they serve the best coffee, but they also provided an excellent stock of design magazines and cookbooks to flick through. 


We ate at falafel cafes and a restaurants that offered a vast vegetarian buffet where you paid for your meal by weight (the plates, not yours). We had liquorice & lemon ice cream (devine), blueberry chocolate, rye breads in every shape and size, nordic berries and chanterelles and of course, there was always room for a cinnamon bun. 

Finland: The House, The Woods, The Lakes

3 September 2014

We've been back from our Finland trip exactly one week: though it seems like an age ago now. We arrived home and got straight back into the daily swing of things within 24 hours: the kids completing their last few days at summer school and us back at work with 'to do' lists as long as our arms.


We're desperately trying to hold onto that holiday feeling: the relaxed clear headedness that you get while away from it all. Finland was what I call a proper break. 


This was our base: a beautiful wooden summer house in Kirkkonummi surrounded by woods and lakes, that our friend and her family generously offered up to us for our stay.


We had quality family time, enjoyed the beautiful surroundings, made new discoveries, enjoyed new experiences and ate lots of cinnamon buns. Yes, the cinnamon buns were really something.

If you ever get the chance to visit Finland, go for it - you won't be disappointed.


The Simple Things

1 September 2014


We've just come back from the most amazing family holiday in Finland. I've lots to share with you about our time there, so watch this space.

In the meantime, I wanted to share my first official / credible / national piece of Buttercup Days press. My Blackberry, Almond & Cardamon Cake photograph is featured in the new (September) issue of The Simple Things magazine. The Simple Things is one of my favourite monthly reads. It never finds its way to my recycling bins; back issues live on my bookshelf as I like to dip into them from time to time.

I was bowled over when they contacted me to ask if they could use one of my food photographs from this blog to illustrate a recipe and as if that wasn't a big enough scoop for me they also asked if I would like to feature in their regular 'My day in cups of tea' feature - the pictures used in that article are mine too. 

Seeing this new issue the day I reluctantly flew back from our holiday certainly made returning home a little easier.

Thanks, The Simple Things - you've made my month.

Chocolate Chip Zucchini Cake | Finland

15 August 2014

We are currently in the middle of a courgette glut. They've been roasted, grilled, stir fried and grated into salads. The kids are on summer holidays and that means that I am constantly being asked for food, so I baked (not for the first time) this Chocolate Chip Zucchini Cake. I like it served as a pudding too; perfect with a scoop of vanilla ice cream and some strawberries. I like to think, that for a cake, it's a little bit virtuous.
The recipe comes from my now sticky and page-splattered copy of The Kinfolk Table: Recipes for Small Gatherings. Below is the original recipes, which I have followed with much success, however I have more recently made the tiniest of tweaks by grating the courgette rather than chopping it. It disguises the healthy bit from little eyes. If you do go down this road, grate the courgette into a clean tea towel and ring out any water before adding. The recipe makes a big cake - perfect for a crowd. But if you have no crowd to feed, just split the mixture between two tins and make two smaller cakes. On this occasion, I wrapped up the second one for my cake-loving neighbour and made his day, but it can also be frozen.

We're off on our summer holidays at the weekend. Our destination of choice this year, Finland, may not be the most typical place for a summer break, but we can't wait! We're going to be staying in a friend's family summer house just outside Helsinki. With pine trees and a lake as neighbours it should be the restful break we all need. When we want to see a bit of life, just 30 mins in the car takes us to Helsinki - we have loads of places we want to visit and things we want to experience and, of course, there could well be a couple of blog posts born there too. 

Chocolate Chip Zuchini Cake

355g plain flour
20g natural cocoa powder
1 tsp bicarbonate of soda
½ tsp baking powder
½ ground cinnamon
½ ground clove
115g butter or margarine, at room temperature
120ml vegetable oil
12 oz caster sugar
2 large eggs, at room temperature
120ml buttermilk
1tsp vanilla extract
340g zucchini / courgette finely diced (or grated)
170g chocolate chips

Preheat the oven to 160℃ / 325℉. Grease the inside of a 33 x 23 cm baking pan and line the base with baking paper.

Combine the flour, cocoa, bicarbonate of soda, baking powder, cinnamon and cloves in a medium bowl and set aside.

Beat the butter or margarine, oil and sugar in a mixing bowl with an electric mixer on a medium speed until smooth, about 3 minutes. Add the eggs one at a time, beating well after each addition. Add the buttermilk and vanilla and beat until just combined.

Reduce the mixer speed to low, add half of the flour mixture, and mix for 15 seconds. Add the remaining flour mixture and beat until just incorporated. Scrape down the sides of the bowl, then beat for 5 more seconds.

Stir in the zucchini and half the chocolate chips. Scrape the batter into the prepared pan and sprinkle the top with the remaining chocolate chips.

Bake for 35 to 40 minutes or until a tester inserted in the centre of the cake comes out clean. Transfer the cake to a rack and cool completely in the pan, about 1 hour. Serve will a dollop of good vanilla ice cream.

{Salad Days} Over On Heart Home ...

6 August 2014


You probably won't know it from looking at this blog, but after cakes, salads are one of my favourite meals to create and eat. Sometimes I follow a recipe and other times I will just freewheel it using what I have to hand and it rarely goes wrong. Note to self: I really ought to share more salads on this blog, if only to show I don't just gorge on cake all the time.

Salad is my topic of choice for my latest Heart Home blog feature. I've teamed up some beautiful salad bowls with some of my favourite salad recipes. Perfect for summer food. To read the full feature just click here.

Leiths School of Food and Wine

21 July 2014

Ten days ago I attended a two day course in food photography and styling at Leiths School of Food and Wine. For a while now I have been taking my own images for this blog, broadening my limited knowledge with online tutorials. It has taken me so far, but there is nothing that can match being in the company of someone who has made a success out of food photography. 
Food photographer William Reavell, who has worked on books with Mary Berry, Rick Stein, Antonio Carluccio, Sophie Grigson and Gizzi Erskine, to name but a few, led the course. Every aspect of food photography was covered; from the technical, which covered exposure, composition, lighting and angles, through to the creative side that tackled styling, plating up and propping images.
It was largely a practical course, which is frankly the only way to learn. The class worked in pairs taking it in turns to both style and photograph the food. On the first day we worked on salads and brownies and on the second day it was stir fries and meringues. We worked in one of the Leiths kitchens with a fantastic range of both produce and styling products at our disposal. I was like a kid in a sweet shop.
This post shows just a selection of the images I took during my time at Leiths. I must say, I did feel more at home styling and photographing the cakes, particularly once I saw that edible flowers were on hand. One thing that this course did unexpectedly provide me with was a definition of my style of work. Talking through my photography and styling with Bill, it became clear how I want to take my work forward visually. He provided me with lots of valuable advice which I intend to follow over the coming months. I can't wait to put it into practise now.

A Blueberry Cake {and some new napkins}

10 July 2014


I made this Blueberry Cake for the little local cafe that I supply on an adhoc basis. They requested
something summery and fruity, which is exactly what this cake is. You could easily replace the blueberries with other berries of your choice; raspberries would be a nice alternative.

You see those napkins in I used in the shot? Well, they were the result of a sewing challenge I recently undertook for Ikea. They sent me a sewing machine with all the basic kit and challenged me to produce a set of napkins using one of their new (free) in-store craft patterns. Once I'd selected my fabric (also Ikea), I set to work and just under 90 minutes later I had a brand spanking new set of six napkins. You can follow my challenge and read more about Ikea's free craft patterns over at Heart Home.


Blueberry Cake

175g soft butter
175g golden caster sugar
3 large eggs
225g self-raising flour
1 tsp baking powder
2 tsp vanilla extract
142ml carton soured cream
3 x 125g punnet of blueberries
200g tub Philadelphia cheese
100g icing sugar 
Preheat the oven to fan160C/ conventional 180C/GM 4 and butter and line the base of a loose-based 22cm round cake tin with non-stick baking paper.
Put the butter, sugar, eggs,flour, baking powder and vanilla in a bowl. Beat with a wooden spoon for 2-3 minutes, or with a hand electric beater for 1-2 minutes, until lighter in colour and well mixed. Beat in 4 tbsp soured cream, then stir in half the blueberries with a large spoon.
Tip the mixture into the tin and spread it level. Bake for 50 minutes until it is risen, feels firm to the touch and springs back when lightly pressed. Cool for 10 minutes, then take out of the tin and peel off the paper or lining. Leave to finish cooling on a wire rack.
To make the frosting, beat the soft cheese with the icing sugar and the remaining soured cream in a bowl until smooth and creamy. Spread over the top of the cooled cake (don’t be impatient as the frosting will melt if the cake is too warm) and scatter with the remaining blueberries or a mix of blueberries and other seasonal berries. Tip: If you want the icing a little thicker, let the frosting in the fridge for a while.