Showing posts with label homemade. Show all posts

A Christmas Wreath

9 December 2013


Christmas, for me, is a great excuse to set those creative juices flowing. I've always hankered after the idea of making my own wreath and this year I finally put it into practice. I attended a local wreath-making evening class last week and this was the result. It's not perfect, but I was really pleased with it being my first attempt and all that. 


There were about 25 of us in the class and after watching a demonstration we were left to our own devices and the array of materials on offer. It was easy enough to make once I had mastered the wiring together of the foliage. I kept it natural and relatively simple and included bay, cinnamon sticks and dried orange to give it a delicious aroma. 

Granted, it's not a very rock n' roll way to spend an evening, but my home now has a lovely festive front door and that pleases me no end. A sign of the times I guess.

Move Over Nigella

9 January 2013


This is the cake that Lily baked for David last weekend. It was her birthday present to him: a gingerbread cake with white chocolate cream cheese icing and sprinkles in 'gunners' red. All very much her own work. Not bad eh?

Dainty Little Cakes

1 November 2011


Last week I made these little Honey and Pistachio cakes. My brother, sister-in-law and niece were coming to spend the day with us and I was running short on time to throw a quick lunch together. We were planning on eating out in the evening, so I needed to prepare a fairly light, but still delicious lunch that wouldn't spoil our evening meal.

I made a quick batch of vegi sausage rolls which I served warm with an onion chutney and a pear and watercress salad. However I can't not offer up a 'pudding' of sorts when people come for lunch or dinner, so these dainty cakes were the perfect sweet treat when served with a dollop of mascarpone. Should you wish to give them a go, here's the recipe ...

Honey and Pistachio Cakes

75g unsalted butter, plus extra for greasing
2 medium free-range eggs
40g caster sugar
3 tbsp of clear honey, plus extra to serve
75g plain flour
40g pistachios, chopped, plus extra to serve
Finely grated zest of an orange
Mascarpone to serve

Preheat the oven to 190C / fan 170C / Gas 5. Grease a 12 hole cake tin. Melt the butter and set aside to cool.

Using an electric hand mixer, whisk the eggs, sugar and honey until thick. This will take 6 - 7 minutes. When lifted out, the beater should leave a trail that its on the surface for a few seconds.

In batches, sift the flour into the egg mixture and fold in gently. Carefully fold in the pistachios, orange zest and the cooled melted butter.

Fill the cake tin holes with the mixture and bake for 8 - 10 mins. Turn out onto a cooling rack. Serve with a dollop of mascarpone, a sprinkle of the pistachios and some drizzled honey.

Enjoy.


Ooh, you ought to sell those ...

20 September 2011


For a while now I've been chewing over the idea of introducing a 'Buttercup Days Boutique' section to this blog. People often tell me that I ought to try selling some of my homemade wares. I love the idea, but I am so short of time and hand making anything is time consuming. Mmm, what to do?

I had this preconceived idea that to sell product I'd need to produce volume, and that was the part I couldn't commit to. So, I've decided to make limited runs of products to sell. Once gone, I may replenish or I might introduce a different product altogether. That is workable and fun I think.

So, to start the ball rolling I am selling my Buttercup Days cake bunting; whilst stocks last. Seriously, I have made ample stock of the bunting, so to find out more just click 'Buttercup Days Boutique' on the right of your screen. Be sure to visit the boutique regularly to see what the current offering is. Remember,  bit of retail therapy is good for the soul.

Here's Four I made Earlier

18 August 2011


Well, I actually made them last week. I had a sudden creative moment when sorting through my collection of scrap fabrics. Cats are very much the rage with my kids at the moment, so cats I made.  I have noticed that a little bit of sowing machine action gets me a few brownie points from Lily and Arthur, which can be nice. My starting point and inspiration for the cats was a gorgeous fabric cat by Jane Foster that Lily gave me the other Christmas. I used the shape as a template for a simple paper pattern. Then I just paired up some patterned fabrics and used felt and embroidery thread for the detailing. Arthur is now the proud owner of the blue cat, which he named 'Blue Cat' and Lily was naturally drawn to the pink and orange cat, which she named 'Pinkie'. Very original names don't you think? The remaining two are gifts in waiting for a couple of special little people. They will for now remain nameless so not to spoil any surprise. But I know that they will be warmly received and loved which makes the little effort involved well worth while.

A Day of Tights & Jam

11 August 2011


Today I've been wearing tights. Tights in August. Where has the summer gone? The weather has been going downhill this week. I've yet to summon up the courage to look at the long-term weather forecast for when we go to Cornwall at the end of next week.

What to do on days like this? Well, we made a batch of plum jam before setting out to buy comics which we took to a coffee shop to read whilst drinking hot chocolate and over-priced coffee.

Please let this grey, wet and windy weather lift and let summer back in.

Buttercup Days Boutique

1 August 2011


The Buttercup Days Boutique has opened it's doors, well sort of. It's all the vogue now to do craft, but I have always been a maker of things. It's nice to be in fashion once in a while. Since having children I've been making all the more; toys, clothes and party bits and pieces. Many friend's see things that I've made and responded with 'oooh, you should sell those'. So now I am.

First up is my miniature bunting for cakes made from my collection of vintage and patterned fabrics. I first made one for Lily's birthday cake earlier in the year and the result was more than satisfactory. Once made, the bunting transformed my simple homemade chocolate cake into a party centrepiece in no time. I showed the results to Sweet Boutique, a lovely little retro sweet shop near to me that sell a range of children's party bits n' bob's and they said that they would happily stock some of the bunting and see how it goes. So I've been busy with bunting lately and this week I dropped off my first order.

Time will tell if they appeal. But in the meantime I have a list of local shops and online retailers to contact to see if they too would like to stock my cake bunting and of course I'm developing a Buttercup Days Boutique page for the blog through which I will sell direct. I'm working on a PR plan too (if I can't do that bit then something is wrong!). It all looks very good on paper. The only thing left to figure out is where the time will come from to make any orders that may result from all of this. But I figure I'll just work that out if and when the time comes. Watch this space ....

Appreciation

20 July 2011


I'm probably going to open up a can of worms with this post. It's the final week of term and school is almost out for summer. This week Lily bought home a letter in a small brown envelope. It contained a polite note from a collective of parents of children in her class, offering other parents a chance to contribute some money that would be put towards a thank you gift for the class teacher and her assistant.

Now, don't get me wrong. I think that teachers do an amazing job and I truly believe that Lily has been blessed to have the teacher she's had for the last academic year. But when did all this 'showering teachers with gifts' start? When I was at school it didn't happen. The nearest thing to it would be if a long standing member of teaching staff was to retire. Then a collection would be arranged and a gift presented in assembly. But these occasions were few and far between. Now it's an annual event. Many 'big' high street shop are displaying their ranges of teacher gifts and cards. Somehow its saddled itself up there with Valentine's day and Halloween and people seem to be buying into it; quite literally.

There is a pressure of sorts. I dare say the teacher's aren't at all bothered. In fact, some may almost dread the onslaught of cards, chocolates, wine, bath oils and whatever else they might receive. With thirty plus children in a class that's an awful lot of stuff. On the other hand you might choose to not join the band wagon, but do you want your child to be the one who doesn't bring in anything for their teacher on the last day of term?

I can see why the note went out about contributing towards a gift. It cuts down on overall gifts and it means the teacher will actually get something nice and useful, as the mother's behind it would, I know buy something 'just right'. But, I don't feel comfortable with it; donating money. Surely the gift is from the child to show their appreciation to their teacher. How is me pulling some money out of my purse teaching Lily anything positive?

Knowing that this was on the horizon, I spoke with Lily about it a few weeks ago. She really wanted to give something to her teacher, teaching assistant and, as she is leaving the school, something to her head mistress too. She then said that she would like to make them presents. I am totally and utterly comfortable with that. We sat down and surfed the net for inspiration of what to make. We came up with these 'teacher boxes', which Lily & I covered with patterned papers and fixed with a ribbon tie. We then bought a number of goodies to fill the boxes with from hand cream & nail files to penny chews and paperclips. Lily was immensely proud of them and so enjoyed making them. She has been excited all week about presenting these gifts to her teachers.

Lots of mums reading this are probably saying that they don't have time to make presents. I don't have time either. I ordered the boxes online late one night, shopped for the content whilst in town last week and almost burnt Sunday lunch whilst juggling cooking with helping Lily assemble and decorate the boxes. I'm not trying to give this 'perfect mummy' image or prove a point; not at all. It was just important to both myself and Lily that we created some time to put in a bit of thought and effort, rather than do 'cash' or buy something the high street shops are flaunting at parents at this time of year. The 'easier' options just don't cut it for me. That's just my personnel opinion.

But I do find myself asking this; is making time to teach our children real appreciation and expressions of thankfulness becoming a dying art into today's hectic time-starved family lives? Do you still make your children write thank you notes or do you just fire off a quick thank you text? Feel free to post your comments below.


Lemon & Thyme Shortbread

8 July 2011


I am ending the weekly marathon of cake recipes with one that is strictly not that. It's a biscuit recipe; a sophisticated, melt-in-your-mouth biscuit. The magic of these biscuits is that they work perfectly with a cup of tea as an afternoon pick-me-up, but they can take on a completely different guise as a dessert biscuit when served with berries and cream. If I haven't already convinced you to make these, I'd like to add that the dough is excellent to freeze. It's a lovely feeling to know that there's some biscuit dough in the freezer lying in wait for a warm oven.


Lemon & Thyme Shortbread Biscuits

Makes approx 48

400g plain flour
2 tsp baking powder
pinch of salt
2 tbsp finely chopped lemon thyme leaves (or ordinary thyme will do)
225g unsalted butter, softened
300g caster sugar
2 tbsp finely grated unwaxed lemon zest
1 free-range egg beaten
Juice of a lemon

1. Sift the flour and baking powder into a large bowl and stir in the salt and thyme.

2. Cream together the butter, sugar and lemon zest until pale and fluffy. Add the egg a little at a time, beating after each addition, then slowly add the dry ingredients mixing well and dribbling in a little lemon juice until the mixture comes together as a dough. Go careful with the juice as the dough shouldn't be too wet.

3. Roll the dough into two log shapes each about 5cm in diameter. This way, each log will make roughly 24 biscuits, so you could save one log for a later time should you wish to do so. Wrap each log tightly in clingfilm and place in the fridge for a couple of hours. However it will remain good like this in the fridge for up to two days.

4. When you are ready to bake the biscuits, preheat the oven to 190C/375F/GM 5. Line a couple of baking sheets with greaseproof paper.

5. Unwrap the clingfilm and slice off rounds of approx 5mm in thickness. Place these on the baking sheet making sure you leave some space between them as they will spread somewhat in the oven. Bake for 10 - 15 minutes, until the edges are just tinged and golden. Carefully remove them with a palette knife and place them on a rack to cool. Enjoy.

Chocolate Brownies

7 July 2011


I've often found that Chocolate brownies can be hit and miss. But since coming across this Linda McCartney recipe seven years ago I wouldn't consider using any other. The recipe makes a generous batch which, once you've tasted one, you will be thankful for.

Chocolate Brownies.

300g unsalted butter
300g good quality dark chocolate (70%) broken into pieces
5 large eggs
450g granulated sugar
1 tbsp vanilla extract
200g plain flour
1 tsp salt

A baking or roasting tin 34 x 25 cm, 6cm deep

1. Pre-heat the oven to 180C/350F/ GM4. Line the baking tin with baking paper.

2. Melt the butter and chocolate together in a heat-proof bowl suspended over a saucepan of barely simmering water.

3. Beat the eggs, sugar and vanilla extract together in a bowl until the mixture is thick and creamy and coats the back of a spoon.

4. Once the butter and chocolate have melted, remove from the heat and beat in the egg mixture. Sift in the flour and salt and continue to beat until smooth.

5. Pour into your lined tin, ensuring the mixture is evenly distributed. Bake in the oven for 20 - 25 minutes, or until the whole of the top has formed a little brown crust that has started to crack. This giant brownie should not wobble, but should remain a little gooey on the inside. Leave to cool for 20 minutes in the pan before turning out and cutting into 28 portions.

The Simplest Orange & Almond Cake

6 July 2011


Now this recipe is a real gem. Never before has a handful of ingredients and a bit know-how received such appreciative swoons and gushes. I came across this recipe a couple of years ago in the Observer's Food Monthly. It belongs to Rosie Lovell who the Observer introduced as 'the queen of the new cafe society; a comfort cook who hangs out with musicians in her Brixton deli'.

I read the article and made the cake. It was sublime. At the time I was writing food related features for the UK design blog The Beat That My Heart Skipped, and I contacted Rosie and she supplied us with a few of her amazing recipes from her beautiful cookbook Spooning with Rosie. I'm now a bit of a Rosie fan, it has to be said.

As I made this cake for an occasion, I tampered with it a little. I added a topping of glazed flaked almonds and some orange rose petals to enhance the overall beauty and to ensure those appreciative swoons and gushes. But when making this at home I stick to the original plain version dusted with a little icing sugar and serve it with a dollop of plain yoghurt and maybe some fresh raspberries on the side. Mmmm.

Orange & Almond Cake.

Makes 12 slices

6 medium free-range eggs
300g golden caster sugar
200g ground almonds
1 large juicy orange
2 tbs water

For the topping (optional)
1 small juicy orange or satsuma (or just use a splash or two of orange juice from a carton)
15g butter
1 tbsp golden caster sugar
50g flaked almonds


1. Grease and line a 25cm loose-bottomed cake tin. Preheat the oven to 160C/Gas2.

2. Separate 3 of the eggs, putting the whites aside in a mixing bowl. Beat the egg yolks with the remaining whole eggs in a large bowl.

3. Add 200g of the caster sugar and all of the ground almonds and mix thoroughly. Grate the orange zest and add this too, keeping the rest of the orange for later.

4. Beat the egg whites until they form soft peaks. Using a slotted metal spoon, fold the egg whites into the thick cake mix, a spoonful at a time. Be careful not to knock the air out of the whites.

5. Now pour this foamy cake mix into the lined tin and place in the oven for 40 - 60 minutes. The cake is ready when an inserted toothpick comes out clean.

6. Leave the cake to cool in the tin and make the syrup. Put the remaining caster sugar in small saucepan and add the juice from the orange and a few tablespoons of water. Place this on a really low heat in order to dissolve the sugar and slightly reduce the syrup. Using a toothpick, plant holes all over the cake and pour over the syrup. Allow the cake to cool and absorb the syrup before removing it from the tin.

7. If you want to go down the flaked almond topping route, here's what you do. Put the juice from an orange or a splash of orange juice from a carton into a small non-stick frying pan with the butter and sugar and melt it all together. After it has sizzled for a minute or so and begun to caramelize, add your almonds. Give it a stir and occasionally tip the pan to keep it all moving. Once all of the liquid has disappeared and the nuts are glossy and coated in the orange-scented glaze, remove to a plate to cool. Then sprinkle with merry abandonment on top of the cake. 


Chocolate Guinness Cake Recipe

5 July 2011


As promised, I am showering you with cake recipes this week - my all time top five no less. Today it's the turn of the wonderful Chocolate Guinness Cake recipe. The addition of the Guinness gives the chocolate cake a rich fudgy taste which is set of perfectly with the White Chocolate Cream Cheese Icing. It only uses a wee bit of Guinness so teetotaler's, expectant mother's and children are free to indulge should it take their fancy. I made and took this cake to my niece's engagement party earlier this year only to leave the party with the job of producing the wedding cake. So beware of the repercussions baking this cake could bring you. It really is that good.

Chocolate Guinness Cake

Serves 10-12

250g softened unsalted butter, plus extra for greasing
200g soft dark brown sugar
100g good-quality dark chocolate, melted
2 large free-range eggs
200ml Guinness
275g self-raising flour
30g cocoa powder
1 tsp baking powder
1tsp bicarbonate of soda

For the icing:
200g cream cheese
75g icing sugar
1 tsp vanilla extract
4 tbsp soured cream
125g white chocolate, melted

1. Preheat the oven to 180C/ fan160C/gas 4. Grease and line a 23cm loose-bottomed cake tin.

2. Beat the butter with the sugar until pale and fluffy - this may take around 5 minutes or so. Gradually beat in the melted chocolate until smooth, then beat in the eggs one at a time.

3. Gradually whisk in the Guinness. You will have a smooth batter at this point. Sift together the flour, cocoa powder, baking powder and bicarbonate of soda, then fold carefully into the chocolate mixture.

4. Pour into the tin and bake for 35-40 minutes until a skewer comes out clean. Leave to cool in the tin, then turn out onto a cake plate.

5. For the icing, beat the cream cheese, icing sugar and vanilla extract together until smooth, then mix in the soured cream and melted chocolate. Spread evenly over the cake and serve. If you want the icing a little firmer before spreading, pop it into the fridge for 10 minutes or so.

The dark sponge against the pale icing is quite stunning, but I do have a weakness of decorating my cakes with a little floral sprig or two. So finish the cake as you see fit and enjoy.


My Top Five Cakes

4 July 2011


Last week I was very busy with cakes. Yes, I know I was going to move on from the cake business thing, but every now and again I'm asked so nicely to bake a cake that I just can't say no. I do love to bake cakes particularly those that are central to happy times, celebrations and milestones. They might only be a bit of home-baked sugar-sweet sponge but they make people so happy and on occasion quite delirious.

It was my good friend Celia who commissioned me to make five cakes for her mother's 80th birthday party. The big bash took place over the weekend in London. The venue was the local church hall and the menu was tea and cake. Yes, literally. No faffing around with sandwiches and alike, but straight into the cake course. Now that's my kind of party! What I liked best about this commission was that I was left to my own devises creatively. The selection that I finally settled on consisted of the following; Courgette Cake (with a Lime Cream Cheese Frosting and Pistachio Nuts); Chocolate & Guinness Cake (with White Chocolate Frosting); Orange & Almond Cake topped with Almonds; Chocolate Brownies; Lemon & Thyme Shortbread Biscuits served with Seasonal Berries and Creme Fraiche.

I chose these five cakes for their variety and interest, but also because I have now made each of them so many times I believe that I have them down to a tee. A few people have been asking lately if I ever share my recipes. 'Of course' is my answer. They're not really mine at all. Some are old recipes that exist on dog-eared magazine tear outs, some are from much-loved recipe books and some are borrowed with a couple of my own tweaks thrown in. But they have become part of my baking repertoire and thus I have great affection to them all. So over this week I am going to post these very five cake recipes, starting with the Courgette Cake, which was taken from the cake bible itself How To Be A Domestic Goddess by Nigella Lawson. Keep these recipes to hand then should a bout of baking come over you in the very near future you'll be well prepared to fully embrace it.


Courgette Cake (with a Lime Cream Cheese Frosting and Pistachio Nuts)

2-3 courgettes
2 large eggs
125ml vegetable oil
150g caster sugar
225g self-raising flour
½ tsp bicarbonate of soda
½ tsp baking powder
lemon curd for the filling
200g cream cheese
100g icing sugar, sieved
I lime
2 – 3 tbsp chopped pistachio nuts


1. Preheat your oven to 180C/ gas mark 4 and grease and line 2 x 21cm sandwich tins.

2. Wipe your courgettes with a piece of kitchen towel and then peel on the coarse side of a grater. Once you have your pile of grated courgette, take a handful at a time and squeeze over the sink to remove excess water, placing the drained courgette in a bowl ready for adding to the mixture in step 4.

3. Put the eggs, oil, and sugar into a large mixing bowl and beat until creamy. Next sieve in the flour, bicarb and baking powder and continue to beat until well combined.

4. Now add your grated courgette and stir briefly until the mixture is flecked emerald green.

5. Divide the mixture equally between the two tins and bake in the oven for approx 30mins. The sponges are ready when slightly browned and firm to the touch. Once cooked place the tins onto a rack to cool for 10mins before turning out to cool completely.

6. Once the sponges are completely cool, you are ready to fill and ice. For the filling simply spread generously with some lemon curd. To make the frosting beat the cream cheese together with the sieved icing sugar. When your cream cheese and icing sugar are combined add a squeeze of lime for a delicious zing.

7. Smear the top of your cake thickly with the frosting. If you want to firm the icing up at all, place the cake in the fridge. Alternatively you can pop the icing in the fridge for 10 minutes or so to firm up slightly before spreading on top of your cake.

8. Just before serving sprinkle with the chopped pistachios and place a coordinating flower in the centre as a finishing touch. The inclusion of the flower is very much my little piece of creative freedom, but is by no means a necessity.

* Please note that this recipe is for a 2 layer cake. However this weekend I made a 3 layer version by adding half the ingredients again to fill a third cake tin.

Thank You For The Music

21 June 2011


Just a short post, but one I wanted to share as it will no doubt make you smile. You may have seen my Father's Day post last weekend titled Daddy The Superstar. Well, here is a peak behind the scenes, aka Lily's creative thought process.

Me: Any ideas of want you want to make daddy for Father's Day?

Lily: Mmm, well what does daddy really really like? 

Lily (after some consideration): I know, his records. His 'Sun' record, because he has that picture on his t-shirt too.

And from that seed came this artwork (it's the framed one, if you were unsure), which daddy was rather chuffed with. We also conducted a photoshoot with a similar theme, images from which made the Father's Day card.

It can be very rock n' roll in our house at times!

Incognito

16 June 2011


Arthur is developing a strong character which is lovely; except when it comes to food. He has a pretty good appetite and will eat most things if the mood takes him. But he will turn up his nose when it comes to being offered fruit and vegetables in their natural unpureed forms. It can be challenging at times. He's not about to have any dietary issues as he will eat soup and fruit purees, plus I can whizz up all manner of vegetables to hide in pasta sauces. It's more a battle of wills.

One of Arthur's favourite foods is ice cream, so I decided to make up some super fruity smoothies and disguise them as this friendly food. Did he fall for it? Hook, line and sinker .... he did. It's a win/win situation.

Berry & Banana Lollies

Using a blender or blender stick, whizz together a chopped banana, 100g of berries (such as strawberries and blueberries) with 125g of natural yoghurt and 100ml of milk. Pour into lolly mould and lolly sticks and freeze. Makes 6 lollies.

Cranberry & Mango Lollies

Make as above, but this time using one chopped ripe mango, 250ml of cranberry juice and 125g of natural yoghurt.


Staying Put

9 June 2011


It's official; our house is now off the market. It's right what they say about moving house being one of the most stressful things in life. I always though that statement was somewhat over dramatic, but the last year has proved my thinking wrong. We had people who wanted to buy our house and ironically,  at the very last minute we finally found 'our house' with an owner happy to drop his price to fit our budget. But the issue of trying to get Lily into a half decent local school kept on rearing its ugly head. The gamble of moving with its huge cost and still no guarantee of getting into the school we want was just too bigger a risk to take. Had it not gone to plan the reverberations would have left us with a guilt that we had somehow failed our children the good education they deserve. 

But 'our house' came along and ticked boxes left right and centre, but it was a one-way ticket to the school we were doing everything in our power to avoid. But we felt powerless, it was ours (or rather our children's) destiny to go there. We'd talk ourselves into the bleak situation - Lily and Arthur are bright and have their heads screwed on, they would get through their years at this school and it would be alright in the end. We were just parents who had come obsessed with schools - it can happen to anyone.

Then a few weeks ago things took an unforeseen turn. Timing, fate, a deep determination not to leave any stones unturned? I don't know. But we have manged to get Lily a place at a local school that is in our opinion is excellent for her.

It's not the route we planned or even considered but it means the pressure to move house is off. My heart may had found 'our house' but my head told us we ought to stay put here for a few more years as ironically we are now in a good place for Infant schools. A new one is opening this September which should well be an option for Arthur. It seems sensible after all the stress Lily's school situation has put upon us to stick here for a few more years. It should offer us some kind on insurance to not have to go through it again with Arthur in a couple of years. We do love our home and I think I will fall in love with it all over again as we're going to go ahead with a few home improvements to keep us ticking over. So, we got a happy ending - a solution that will more than do.  This morning I went into Lily's new school and signed the necessary documents. Afterwards, I delivered a note to her current school to inform them of our decision. The relief I feel now this episode is over is immense - huge. I'm excited about the future again.

What A Swell Party It Was ...

18 May 2011


Yesterday afternoon we threw a small party at home to celebrate Arthur's 2nd birthday. It was delightful. All the little guests seemed to enjoy the celebration. Experience has taught me that the under 6's actually make perfect guests, so long as you keep the numbers low (our party was for 8). A simple meal and plenty of toys to hand is a winner for them. Those who know me are aware that I have difficultly keeping things 'simple', but I think I did okay. I forcefully limited my creative bursts to the cake, a bit of decor and a little take-home gift. The weather was dry so we decided to bring some of the party outside. The children enjoyed playing in the red house (which was a rather weather-beaten pale pink until I got handy with a paint brush last week). I put table and chairs outside complete with printed place names and little floral arrangements (I know they're only two, but just humour me!) for an alfresco tea of fish-fingers & chips. When plates were clean out came the birthday cake. Arthur simply loves cake and ice-cream, so I kind of combined the two, making individual ice-cream cone cakes. They are basically a cupcake baked into an ice cream cone. The result was complete silence, a high usage of wet wipes and 100% approval from the little people! After more play came home time, which some guests find a little hard -  after all who ever wants a good party to come to an end? But I hoped that the take home gift of a jar of homemade playdough and a bag of No. 2 shaped chocolate-chip cookies made it a little bit easier to bare.

Party Time - Part Four: The Bags

31 March 2011


It's onwards and upwards with the 'party posts'. The subject of this post is the all-important party bag. Now, I'm unaware of when the party bag thing became an essential part of a children's party - sometime between being a child myself and becoming a mother who throws birthday parties for her children I guess. In my day you would take home a slice of birthday cake wrapped in a piece of kitchen roll and, if you were lucky, perhaps a balloon. 

Well Lily assures me that party bags are the pinnacle of all good parties and every child loves to receive a bundle of booty to take home with them. I've been witness to many types of party bag over the last few years. It seems that the likes of Disney Princess, Hello Kitty, Spiderman and Thomas the Tank Engine have the monopoly on the party bag, which seems wrong to say the least. Also they are incredibly 
un-eco and throw-away. So if Lily wants party bags she has them my way; unique, simple, handmade and hopefully longer-lasting.

The bags themselves I make from fabric. They are really quick to run up on the sowing machine. They are fasten with ribbons that I finished off with some spare pom poms that I had left over from the fabric party hats. The contents were kept simple as the children also took home their fabric party hats and a tissue paper pom. Inside each bag was a Chocolate Bar, a Tunnocks Teacake (just love the wrapper), Bubbles, Seeds (Giant Cinderella Pumpkins), Coloured Pencils and a printed poem (The End by A. A. Milne from Now We Are Six). To make the contents that little bit special I replaced all the wrappers (other than the Tunnock Teacake of course!) with my own wrapper designs that fitted my theme of 'bright patterned retro prints'. Some may say it's a step too far, but I found it a rather nice way to round things off. 


Party Time - Part Three: The Hats

28 March 2011


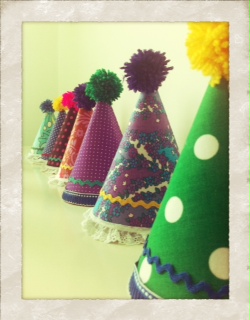
This is the final 'party' post for today, but there are still a couple more to come tomorrow or later in the week. Now let me introduce you to my homemade Party Hats. 

In the back of my mind, I have a business plan to start a small venture, providing 'bits' for children's parties. These hats were the start of that idea and I used Lily's party as a trial run for them. Without doubt people love them, but they are so very time consuming to make. I need to find a way to cut back on the time otherwise they're not a viable product to make money from. Any advice or feedback would be gratefully received!

Many of the fabric's I used were vintage or vintage inspired. I remember a yellow and brown floor-length party dress I wore to lots of parties as a little girl and that memory triggered the inspiration for these hats. I started off with mass-produced pom-poms for the top, but they were too perfectly formed and fluffy, so I bought some wool and made my own, which I think finished each hat off much better, yet added another five minutes per hat!

I'm a bit 'hatted out' for now, but soon I will revisit them and see if there is any life for them out there in the mad and crazy world of children's parties.

Party Time - Part Two: The Poms


These are my Poms. Everybody loves a Pom it seems. I made fifteen of them to decorate our living room with for Lily's party this weekend. After the party each child took one home with them. A few children on receipt of their Poms squashed them on top of their heads to make them look like hats and did several laps around the living room - it was a full energy party you know! Other's carried them out the door like they were the most delicate petal flower they'd ever held and took them home to hang from their bedroom ceiling - it has to be said, that reaction warmed my heart deeply. 

I first made Poms for Lily's party last year and they went down really well. This year was going to be all about my fabric party hats - these were to be the new Poms. But as the party drew nearer parents of children who came last year began to ask if I might be doing the Poms again this year as their son or daughter loved theirs and still had theirs up from last year. One mother even told of her daughter's recent Pom trauma that was bought on by the delicate Pom not surviving their recent house move. I felt a huge responsibility to go down the Pom road again and I ordered my batches of tissue papers.

Poms are actually great for many reasons. Firstly they create quite an impact decoration wise and they are cheaper to make than alternative similar garlands. They're also a good eco option as the children won't want to throw them away and the Poms can continue their existence quite happily hanging from a bedroom ceiling. The original reason we opted for Poms was that unlike a balloon they won't go bang. With Lily not keen on balloons it seemed the best option. Who would have thought they would have gained such a fan base. I'll probably be making them for her wedding reception in years to come!